Requirements
The Elements iOS SDK requires Xcode 11 or later and is compatible with apps targeting iOS 11 or above.
Installation
Elements for iOS are available through CocoaPods.
CocoaPods
Add pod 'Elements' to your Podfile. (Latest version: 1.1.8)
Run pod install.
Usage
ElementsAPIClient
The ElementsAPIClient handles the low-level API communications to Elements server. i.e. Card Tokenization
Initialize the API client
The API client requires clientToken fetched from your backend server. Once you have obtained your client key you can initialize the API client in the following way.
let apiClient: ElementsAPIClient = ElementsAPIClient(
    config: .init(
      // Configure your environment, eg. production vs sandbox
      environment: .production(clientToken: clientToken),
      // Optional if you want to take fall back to stripe
      //if elements tokenization failed
      stripePublishableKey: stripeTestKey
    )
)
In order to call the tokenize API, you need to create and pass in the ElementsCardParams object, for example:
let card = ElementsCardParams(
  cardNumber: "4242424242424242",
  expiryMonth: 2,
  expiryYear: 24,
  securityCode: "242",
  holderName: "Test"
)
Once you have created the ElementsAPIClient and ElementsCardParams you can call the following to tokenize a card.
apiClient.tokenizeCard(data: card) { result in
  switch result {
  case .success(let response):
   if let elementsToken = response.elementsToken {
     // Now you can pass this token object to your backend server
   }
   if let fallbackStripeToken = response.fallbackStripeToken {
     // If Elements tokenization failed, a stripe token will be generated if you have provided the `stripePublishableKey`
     // You can pass the stripe key to your backend server as a fall back.
   }
  case .failure(let error):
   if let apiError = error as? ElementsAPIError {
     // Error contains the reason why tokenization failed.
   } else {
     // Generic Error object (i.e. network failed because of bad connection etc)
   }
 }
}
ElementsToken
The ElementsToken struct returns the response received from Elements server once tokenization succeeded. It contains the corresponded elements token matching the ElementsCardParams you passed in the method. It will also contain an ElementsCardResponse object that has the tokenized card info.
▿ ElementsToken
  ▿ id : "tok_xxxxxxxxxxxxxxx
  ▿ card : ElementsCardResponse
    - id : "card-9a0bb04b-f5fb-4b3c-9129-15ae830ed585"
    ▿ last4 : Optional<String>
      - some : "4242"
    ▿ expiryMonth : Optional<UInt>
      - some : 2
    ▿ expiryYear : Optional<UInt>
      - some : 2042
    ▿ brand : Optional<String>
      - some : "VISA"
    ▿ fingerprint : Optional<String>
      - some : "w98Ef4AjZdgXlfBgzfYa4jnorJSFGHrH1ilsXw2xwl4="
3DS2 Flow
ElementsAPIClient also supports tokenize card with 3DS2 auth flow enabled. In order to handle 3DS2 flow correctly you need to pass a authContext param to the tokenization method.
private func tokenizeCard(card: ElementsCardParams) {
  apiClient.tokenizeCard(data: card, authContext: self) { [weak self] result in
    guard let self = self else { return }
    self.cardComponent?.stopLoadingIfNeeded()
    switch result {
    case .success(let response):
      if let elementsToken = response.elementsToken {
        print("Tokenization success! Check elements token object.")
      }
      if let fallbackStripeToken = response.fallbackStripeToken {
        print("Stripe tokenization success!")
      }
    case .failure(let error):
      if let apiError = error as? ElementsAPIError {
        print(apiError.errorMessage)
      } else {
        print(error.localizedDescription)
      }
    }
  }
}
To conform to the protocol you need to do the following:
extension YourViewController: ElementsAuthenticationContext {

  // Required, usually this gonna be your main controller hosting other view controllers.
  func elementsAuthHostController() -> UIViewController {
    return self
  }

  // Optional if you want to listen when the 3DS2 flow will begin.
  func authContextWillAppear() {
    print("3DS Auth controller appear...")
  }

  // Optional if you want to listen when the 3DS2 flow dismissed.
  func authContextWillDisappear() {
    print("3DS Auth controller disppear...")
  }
}
ElementsActionDriver
The ElemenetsActionDriver handles Elements redirect payment methods, i.e. Paypal/Kakao/Klarna etc...
Initialize the action driver.
The action driver requires clientToken fetched from your backend server. Once you have obtained your client key you can initialize the action driver in the following way.
lazy var actionDriver: ElementsActionDriver = {
  .init(
    configuration: .init(
      // Configure your environment, eg. production vs sandbox
      environment: .sandbox(clientToken: "Your client token..."),
      // Configure your application return URL scheme.
      returnURLScheme: "io.sampleapp.elements.payment",
      style: nil
    ),
    completionDelegate: self,
    presentingDelegate: self
  )
}()
Setting up the required components.
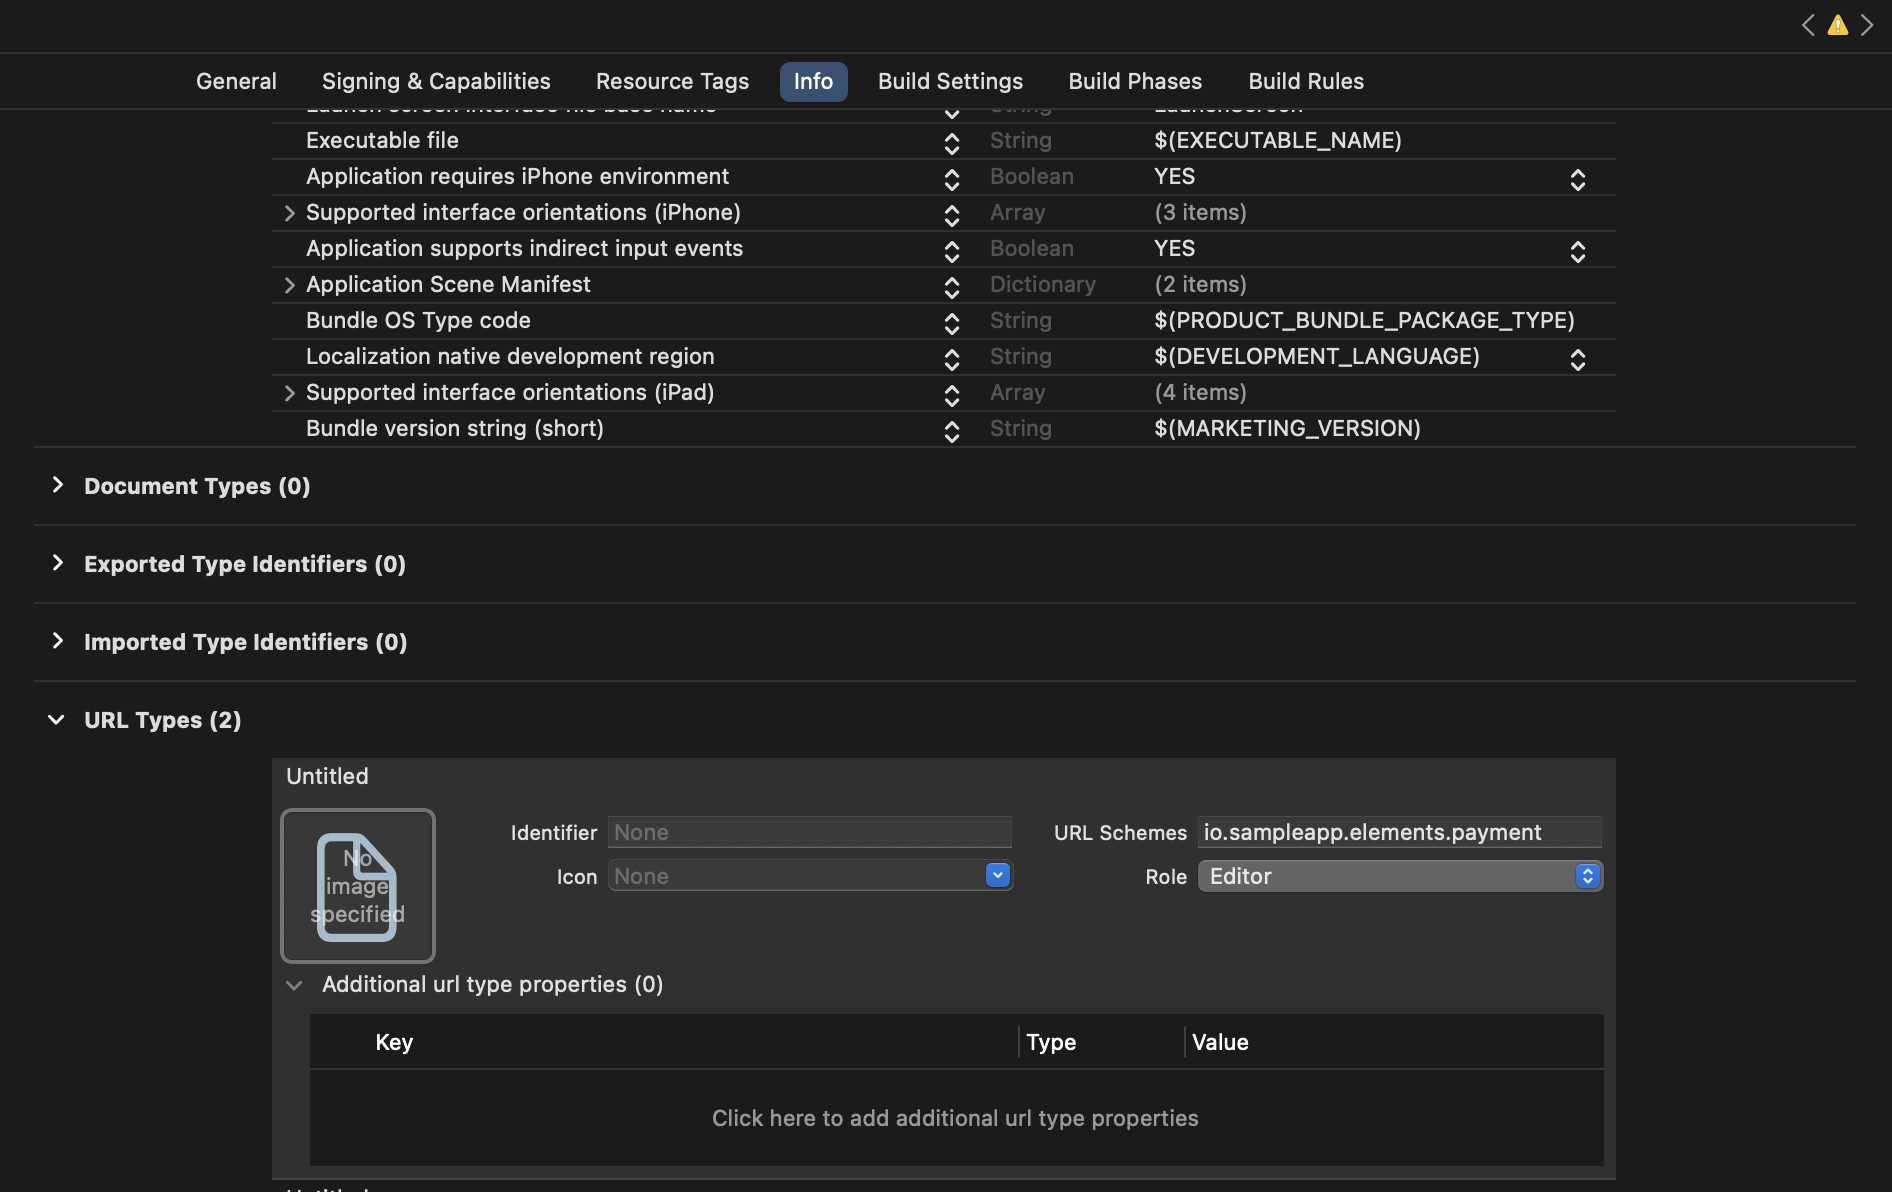
Add return URL scheme
- You need to config URL types in your XCode project to match the one that you used to initialize ElementsActionDriver.

XCode project illustration.
- Import Elements and Implement the following function inside your AppDelegate file
import Elements
import UIKit

@main
class AppDelegate: UIResponder, UIApplicationDelegate {

  //...

  func application(_ app: UIApplication, open url: URL, options: [UIApplication.OpenURLOptionsKey: Any] = [:]) -> Bool {
    RedirectElement.applicationDidOpen(from: url)
    return true
  }

  //...
}
Implement required interfaces.
extension YourViewController: ElementsActionCompletionDelegate {

  // Elements SDK will trigger this function when redirect fails.
  public func didFail(with error: Error, driver: ElementsActionDriver) {
    requestToDismiss()
  }

  // Elements SDK will trigger this function when everything succeeded and returns
  // elements token.
  public func didSuccess(with token: String?, driver: ElementsActionDriver) {
    print(token)
    requestToDismiss()
  }
}

extension YourViewController: ElementsViewControllerPresentingDelegate {

  // Implement this function to decide how to present Elements' redirect view controller.
  public func requestToShow(viewController: UIViewController) {
    present(viewController, animated: true)
  }

  // Impelment this function to decide how to dismiss Elements' redirect view controller.
  public func requestToDismiss() {
    dismiss(animated: true)
  }
}
Start ElementsActionDriver
actionDriver.startPayment(type: "vipps") // Starts vipps payment method
actionDriver.startPayment(type: "paypal") // Starts paypal payment method
Example App
Clone this repo and run pod install and then open Elements-iOS-Demo.xcworkspace. The demo app demonstrated how to use ElementsAPIClient.